Monday 18 August 2014

Woodworking Workbench Build - The Plan

Every beginner woodworker will quickly come to realize the grave need for a solid flat platform where one would clamp, hold, chisel, saw, plane, glue and assemble all woodworking projects. Also, it would serve as storage for tools which are most often used. In this post I will kickstart the building of my workbench.

Firstly, I watched Paul Seller's bench build video series to get a base idea. The video series proved to be an excellent source of inspiration, motivation, tutorial and technique in wielding hand-tools in order to shape wood into a form which is not only useful but aesthetically pleasing. It's an awesome introduction to the world of woodworking for the beginner. After watching  other videos on Paul's Youtube channel, I had a basic understanding on the requirements of a woodworking workbench.

Next I watched an interesting workbench build by Asa Christiana and Matt Berger at startwoodworking. Interesting in the sense that I saw woodworking done using the power-tools approach. Their site has access to several project videos which demonstrates this. Of course, one would see these fabulous guys reaching for hand-tools once in a while when the need arises.

Then I continued watching even more videos on woodworking workbenches on Youtube. Note the growing appetite for more information. The words "Big Data" popped into my head right after typing that out.

Lastly, I got my hands on two of Christopher Schwarz's workbench books. These are :
With this acquisition I decided I had enough theory on woodworking workbenches. I had a pretty good picture on how my bench should look like in my head but somehow I had this urge to put it down on paper. I had attended a semester of technical drawing class while pursuing my engineering studies a while back so I had the experience but in this day and age, a digital image would be more useful I reckoned.

This meant I would need to learn a CAD software package. While looking for an open-source 2D CAD program for Linux I happen to stumble on SketchUp. SketchUp is an awesome yet easy to learn 3D CAD package which is available for free. The only drawback was that it ran on Windows but I would have to make an exception. I just watched the tutorial videos which were available on SketchUp's website and in no time I had completed the sketch of my workbench.

A draft sketch of my workbench.
I decided to make a really simple bench which adhered very closely to the fact that a workbench is nothing but a large surface for clamping. The draft dimensions for the top are 24" wide by 60" long by 3" thick with a height of about 35" off ground. I somehow believe the bench height used by Paul Sellers is suitable for my posture. There's an overhang of about a foot on each end. The left-hand space will be occupied by a 9" Irwin Record 52 1/2 ED woodworking vice.

This is the overall plan for the bench build. Since the bench is a work in progress, I am sure I'll be making changes as I go along.

Tuesday 1 July 2014

Mother's Day Jewellery Box - Cutting the joinery

I wasn't able to make the Mother's Day deadline nonetheless the project remains a go. Paul Sellers, my go to woodworking brother, repeatedly has stressed the importance to prepare, i.e. joint, dimension and cut, all your wood prior to starting a project. Yet I somehow neglected to properly check the dimensions of the boards which I had chosen for my top and bottom panels. It turns out these were a little short on width. After much thought i.e. sulking, I decided to laminate the top and bottom panels from the same boards which I used to construct the panels for the two sides, front and back. That would probably make it into another post, insyallah.

Before I proceed I would like to mention that I am attending the on-line Masterclass conducted by the terrific Mr. Sellers. Its really worth the money if you have it otherwise his blog and free videos are excellent tutorial for any beginner-level woodworker using the hand-tools approach.

In this post, I'll document the joinery aspect of this project. The joinery used for this project was the box-joint ( a.k.a. finger joint ). So the sides, front and back panels were joined together by a row of alternately cut square pegs and notches, glued to form a joint which is of comparable strength to the dovetail joint. For greater visual appeal, I decided to cut the pegs and notches half inch wide. Also, I intended to construct all the panels into a box before cutting the lid out. Therefore, I made one notch and the mating peg a sixteenth of an inch wider to accommodate for the saw kerf width. After laying out the joinery with pencil on one of the panels, I then proceeded to cutting with a gent's saw.


Cuts on the panel edge made with the gent's saw.
Close-up of the cuts on the edge of the panel.
With the sides of the pegs cut, I used a chisel to remove the waste material in-between. These formed the notches. The setup for the process is shown below.

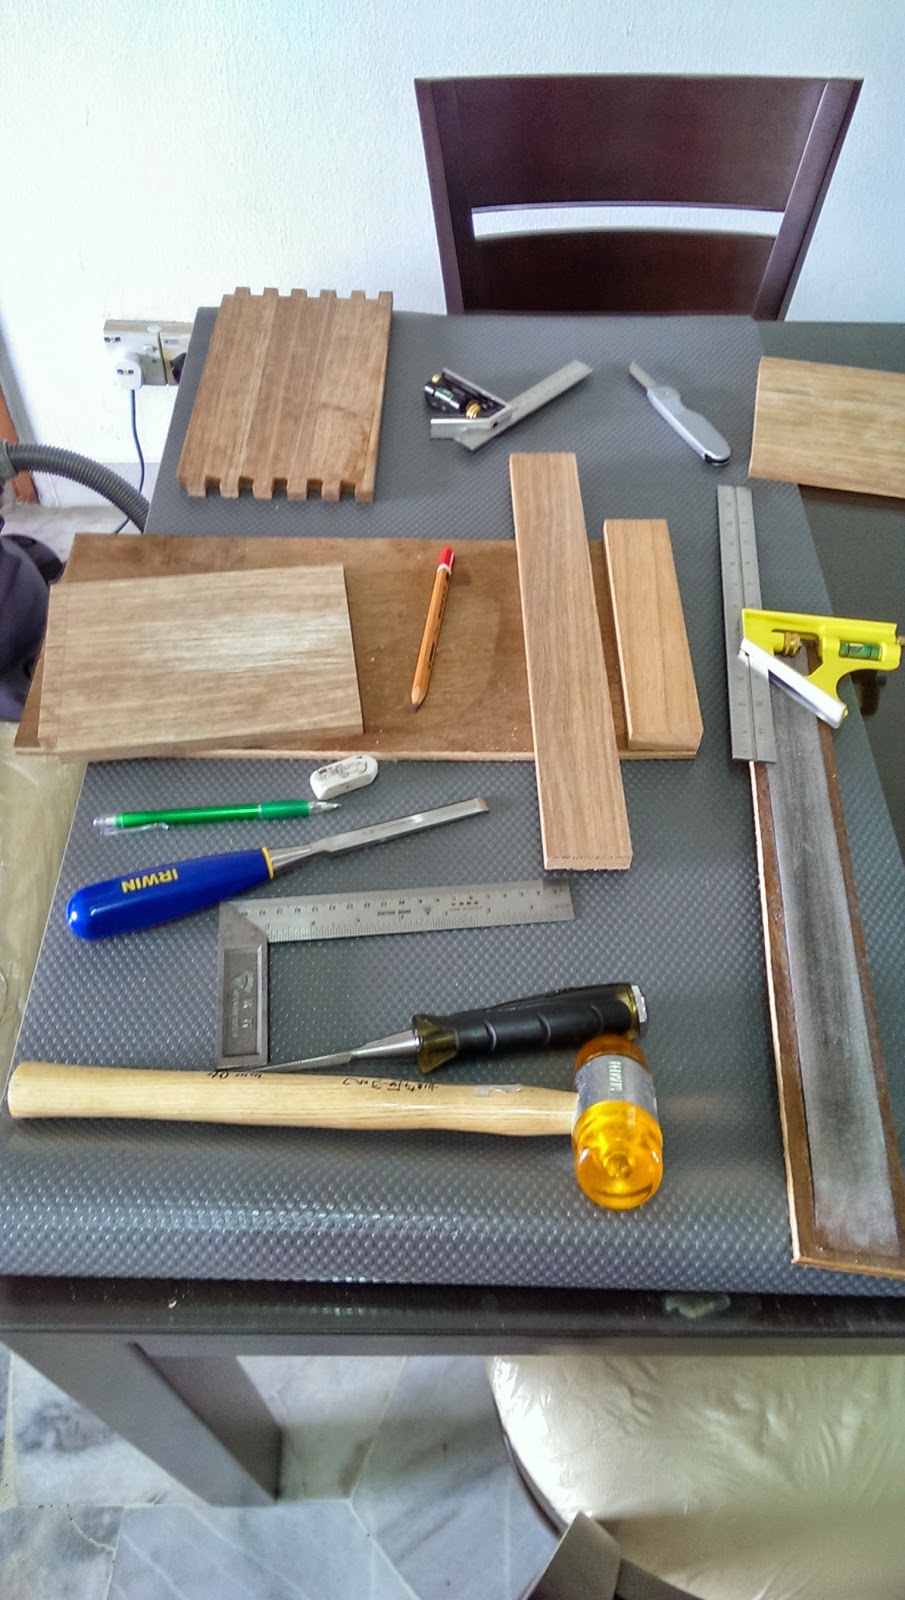
Work-space and tools involved in marking and cutting the joinery.
After cutting the joinery on both edges of the panel, I discovered that the layout lines were skewed as one edge was out of square. This was remedied by deepening the notches which in turn meant the box would be shorter in length. Consequently, the remaining panels were checked and squared  before laying out the joinery.

After cutting a few notches, I found out that the chisels would get blunt. Hence I started to strop the chisel after every alternate notch was cut using a homemade leather strop with blue rouge compound sold under the brand name Dialux. This compound was bought locally at Touch DIY.

The complete joinery cut on an edge of a panel.
On subsequent panels, after realizing the repetitive nature of the joinery, the pegs were laid-out using a cardboard template. This proved to be more convenient and less error-prone. However, as I tried to make the template reusable, I decided against including the sixteenth of an inch for the peg where the lid would be cut through. As a result, the joinery cut on one of the panels was off by a sixteenth of an inch. I also started using a coping saw to remove the bulk of the waste before paring down to the line with the chisel.

Dry-fit assembly of the box panels.
Once all the joinery on the panels were cut and test-fitted, the box was assembled to check for overall fitting and squareness. The dry-fit assembled box was found to be surprisingly sturdy but slightly out of square. In the picture above, note the proud pegs which were a result of the skewed layout. Now, it was time to glue-up the assembly.

Mock glue-up of the assembly.
A rehearsal of the glue-up was carried out. I decided to use the straps which were bought locally at IKEA, sold as luggage straps, in conjunction with the quick-adjust clamps. These straps were rated at 1000 kg each. Masking tape was applied to reduce glue drips and marks left-over from clamping. Using a 3-inch accurate engineer's square, I squared all panels to the smallest error possible. After I was pleased with the mock-up, the actual glue-up took place.

It is most interesting to note that just the addition of glue drastically changes the systematic rehearsal to a gooey dripping mess in the actual assembly. I mistakenly glued two panels in the wrong order and the hesitance from the joinery coming together should have alerted me but I pounded it in with my mallet anyway only to realize it after. But by God's grace, no serious damage was done and I was able to rectify the situation in time.

Actual glue-up of the box assembly.
After the glue had dried up, while removing the straps I noticed that deep dents on the edges where these were applied. Also, I realized that I could have just used the straps with cauls and/or wedges to secure the entire assembly without using the speed clamps at all. With the glue-up complete, I trimmed the pegs flush to the box surface using a combination of a flush trim saw and a sharp chisel without removing the masking tape. This was then followed by a session of fill-in the gaps using Minwax's wood filler in a tube. I found that it was much easier to apply the filler with my fingers rather than a putty knife and that's what I did for all other noticeable gaps.

Gaps in joinery filled with wood filler.
Below is picture of the final glued assembly of the front, back and side panels. The wood grain and colour of the Nyatoh wood looks really good I would say. An oil finish of either boiled linseed or tung or teak oil would help highlight the grain pattern and enhance the natural colour of the wood even more.

Finished box assembly of the side, front and back panels.
However, for now, this project has been put on hold in order to make way for my bench build. Woodworking has become quite a challenge lately as I am unable to clamp down my workpieces properly. Also, I need a flat surface for constructing panels and also to put my stuff on for longer periods. The dining table is just not good enough. Lesson learned - A bench is an indispensable tool for a woodworker and the very first jig/tool that one should build. I know that I have but reiterated exactly that which has been stated by numerous others before me. With that mentioned, it is now time to build a workbench.

I will be posting on the woodworking workbench project soon.

Thursday 24 April 2014

Mother's Day Jewellery Box - Truing the laminated stock

Recently, I managed to get my Record No. 4 plane up and running. Will do another post on that specifically. It took a while though. For a beginner, it was quite an interesting learning curve. Anyway, after the glue-up, I now had the boards for the front, back and two sides of my box laminated.

The resultant laminated boards from the glue-up.
Using a straight-edge, a combination square in my case, I checked the boards for cup, hollow and twist. The boards were found to be acceptable as were. The only thing which needed to be planed were the ridges left from the lamination process. The boards were put on my bench and held against a couple of bench-dogs which I made from a broomstick I rescued. I quickly found that my bench was not suitable for planing work. It was too light and had a tendency to topple over. I had to secure it against the wall before I could start planing work. Note to myself - You really really need a proper bench.

The set-up before planing the boards.
The picture above shows the set-up. Notice the purple rag at the far edge of the bench. That's to prevent marring the paint on the wall. Also notice the hand-made bench-dogs. The bench-dogs were cut from the broomstick which was sanded with 240-grit sand-paper to remove crud. The cut pieces were held, width-wise up, under the bench holes while I traced the outline of the hole. Using a sharp chisel and home-made bench hook, I then shaved the pieces down to the traced line while intermittently checking for a snug fit. My apologies for the deviation off-topic but thought it may be worth the trip.

Bench supported against wall.
Once the board and the bench were securely positioned, I started taking full-width shavings across the face of the board, along the grain, moving from right to left. This required considerable effort until I eventually retracted the iron a little. I realized then that I was taking way too much off hence the effort required in moving the plane.

It took a little tweaking to get the proper sized shavings. I was aiming for full-width translucent shavings which I could see through. This was supposed to be the ideal shavings expected for a final finish using a smoothing plane. This tweaking I would agree is best done on a test instead of your work piece.

When I ran my fingers across the face of the board, I felt tiny ridges along the length of the board. These were left over when I failed to slightly overlap the plane swipes. Upon rectification, I was amazed at how well the plane cut and the finish it left behind. It was super smooth to the touch and the surface glistened under the room light.

This was only true for the first two boards. The following boards however didn't finish as smooth as I could feel gritty dust-like particles on the boards. There was a mention about Nyatoh timber and high silica content as I recall from a previous post. I finally concluded that the iron must have blunted somewhat but the finish was nonetheless acceptable i.e. shiny smooth. I would like to hear if someone had a similar experience and/or an alternate explanation.

In conclusion, this was an excellent exercise. Lots and lots of learning and loads of experience points earned especially in using hand-planes. To top that off, so much FUN! Truthfully, I am a whole less afraid of planing now and have discovered it to be an invaluable tool in woodworking. Dare I say, it was quite pleasurable too.

Off to cutting joinery now.

Tuesday 15 April 2014

Mother's Day Jewellery Box - The Glue-Up

To start this project, I needed wood preferably S4S (Surfaced 4 Sides) as I have no access to tools nor skills required to true and square my own lumber. From memory, I was able to recall a shop which sold what seems to be surfaced wood for woodworking.  I decided to pay this shop a visit.

It turns out this shop, known as Hoctrade Sdn Bhd, carries numerous shapes and sizes of surfaced wood for cabinetry work. Most of their Nyatoh timber stock is however surplus from orders made by customers in advance. This simply meant that one may not find the same shape and size of wood the next visit although an order could be placed for a specific configuration if it is so required. This would be a little more expensive I was told. Despite that Hoctrade is still a haven for beginner level woodworkers like myself. A few visits later, I  had myself a small lumber yard at home of various shapes and sizes.

I decided to make the front, back and sides from 1/2' thick x 2' wide boards glued-up to make 6' wide boards. Also, the 2' wide boards were roughly cut to the individual lengths of the top, bottom and sides before joining instead of attempting to glue 40+' long boards. I had neither the confidence nor enough clamps for the latter task.

Glue-up of the front piece.

Due to the lack of experience, I went ahead and glued-up two 2' wide boards first. After those were dry, I then glued the third piece as shown in the picture above. These steps were repeated for the back and two sides of the box.

The completely glued-up front piece.

I learned from this exercise that a rehearsal, as suggested by numerous other woodworkers, was an absolute necessity. Also, once the two edges were joined, I used my fingers to gauge that the edges were meeting to produce a flush face without minding the glue. This technique was suggested by Christopher Schwarz on either his blog or book. I adjusted the two edges until flush before clamping across the middle. I repeated the same steps before applying clamps across the sides. Only then did I wipe the excess glue off with a damp cloth. After which I clamped over the joined edges to ensure a flush face while the glue sets. These were roughly the steps which I eventually came to while attempting to produce a flush edge-joined board.

The front (left) while the back piece is under clamps.

I would have to agree that one can never have enough clamps but do spend a little more on quality. Its sound investment. A casualty resulted from the glue-up process. These Rolson's were cheaper alternatives to the Irwin clamps bought at Ace Hardware.

Glue-up casualty. Quality does matter.
At the end of the process, I had glued-up all the pieces which I needed for the box. The glued-up edges in all the resultant boards were not as flush as I wanted as I was trying to save myself the effort of planing the boards true. I guess the use of the smoothing plane is inevitable but that would be covered in another post.

The resultant boards after the glue-up.

Notes on Nyatoh timber :
  • Foreign sources advice against its use as it is claimed to be irresponsibly harvested. The Malaysian Timber Council however don't seem to have such a stand.
  • Warning! Some sites mentioned that certain species of Nyatoh have high silica content which would rapidly blunt cutting edges.

Thursday 10 April 2014

Hand Tools - The Initial First Few

Below are some pictures of hand tools I recently purchased to kick-off learning woodwork. This set was bought some time in February at, now my go to hardware shop here in Kuala Lumpur, See Hup Hardware.  A German made soft-faced hammer and some Irwin Marples chisels seem worth a mention. The owner was too kind as he actually allowed me to go through his stock to find the perfect hammer.
I have since acquired a whole lot of hand tools over the past few months. I'll post more pictures since I actually have a reason to now.

My first few hand tools. The highlight of the lot, a Record No. 4 plane.
I was surprised to find a Record No. 4 smoothing bench plane and better yet, its a "Made in England" variety.

Record No. 4 smoothing bench plane.
You'll see this printed on the box in some of the pictures. Specifically, it says "Made by Record in Sheffield England". I went a little over the edge with the photos and have decided against posting all of these here on the blog. Instead I have compiled an album which you can view here.
Now its time to tune-up the hand plane. After watching hours of videos on hand-plane tuning, I can say this is going to be a lengthy but an exciting process.

Tuesday 8 April 2014

Mother's Day Jewellery Box

What better way to kick-off learning woodwork by making something for the person who pretty much made you who you are today. Yes, I am talking about mothers, in particular my mother. Mother's day is around the corner and so I thought of making something special for my mother. Browsing through Pinterest, I found this jewellery box which stood out and caught my attention.

What's even better, after following a trail of links, it brought me to Jeff Greef's woodworking site where this project is available with free plans. The immediate down-side as I was going through the project's site was that the woodworking instructions were for machines. The pun is unintended. But the project is still doable with hand-tools I reckon. Anyway, hand-tools are all I have so far.